Current date/time is Tue May 14, 2024 1:37 pm
Search found 42 matches for Admin
Replacement bulbs/globes
Low Beams: H7High Beams: H1
Front Parks: BA9
Fogs: H3
Fog Turning Lamps: 1156 (or BA15S)
Reverse: 7440
Front Indicators: 1156 (or BA15S) (if removing orange lens use amber globe)
Rear Indicators: PY21W (or BAU15S / 7507 (30°offset) Amber)
Tail/Brake Lights: 7443
Series 2 Eye level brake light (3): W16W or 921 (also T15 fitment, but a standard T15 globe is lower power)
Interior Courtesy: 3022 31mm festoon
Side Indicators: WY5W (or W5W/194/168/501 Amber)
- on Wed Dec 02, 2009 4:54 am
- Search in: Vr4 knowledge
- Topic: Replacement bulbs/globes
- Replies: 0
- Views: 872
Wheel Sizes and Offsets - Stock & Aftermarket
Stud Pattern: 5x114.3Stock wheels are:
Pre-facelift: 16"x6" Offset 46mm - stock tyre 205/55/16
Facelift: 16"x6.5" Offset 38mm - stock tyre 225/50/16
This means that the facelift wheels actually have 2mm extra clearance on the inside and stick out an extra 14mm.
Stock Evo Wheels are:
EVO 6 17x7.5" Offset 38mm Weight 9.5kg Made by OZ
EVO 7 17"x8" Offset 38mm Weight 10.1kg Made by Enkei
EVO 8 17"x8" Offset 38mm Weight 9.3kg Made by Enkei
EVO 9 17"x8" Offset 38mm Weight 9.1kg Made by Enkei
Best tyres for EVO wheels are 235/45/17
OR if you want a really low car and don't want rubbing problems, go 225/45/17
Aftermarket Wheel fitments that have been tried/tested
7.5" +32mm
7.5" +35mm
7.5" +38mm
8" +35mm (rear Lip MAY require rolling)
17x9.5" +35mm (17's only with guard rolling required)
As far as tyres go:
For 17x7 = 215/45/17 or 215/50/17
For 17x7.5" = 225/45/17 is best
For 18" = 225/40/18 or 235/45/18 are the two best options,
however 235's will require very good guard rolling .
- on Thu Nov 12, 2009 5:55 pm
- Search in: Vr4 knowledge
- Topic: Wheel Sizes and Offsets - Stock & Aftermarket
- Replies: 0
- Views: 465
Standard JDM stereo wiring
yellow/red = right rear spkr +vegrey/red = right rear spkr -ve
yellow/blue = left rear spkr +ve
grey/blue = right rear spkr -ve
white/black = signal (antenna)
white/blue (thin wire) = unsure
blue = +12V ignition
red/black = +12V permanent
green/white = lights
black/yellow (thin wire) = unsure
white/blue = left front +ve
black/blue = left front -ve
white/red = right front +ve
black/red = right front -ve
- on Thu Nov 12, 2009 5:51 pm
- Search in: Vr4 knowledge
- Topic: Standard JDM stereo wiring
- Replies: 0
- Views: 460
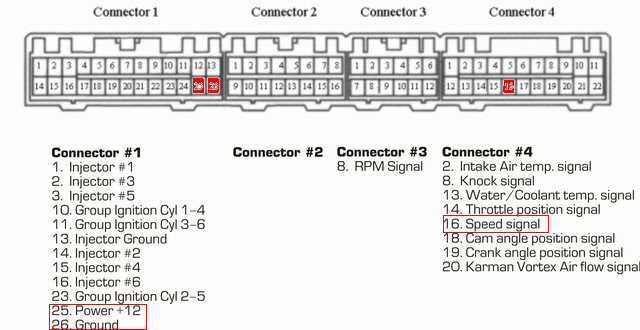
Diagnostic Codes - The Full List
With the iginition on, but enging NOT running - ground Pin 1 to Pin 4 of the diagnostic/OBDII connector (using a bit of wire or paper clip) which is located by your left knee up under the dash. You will then get the engine light, N of the trans, ABS, TCL and ASC (if you have them) flashing.To read the codes it will be a series of long then short flashes, ie the TCL light flashing _ _ _ _ *pause*. . . . . indicates code 45 (if you get what I mean) There will be a very long pause between each code if you have more than one error code.
The connector looks this shape, and this is the pin configuration:

- on Thu Nov 12, 2009 5:38 pm
- Search in: Vr4 knowledge
- Topic: Diagnostic Codes - The Full List
- Replies: 1
- Views: 752
Diagnostic Codes - The Full List
Engine Codes12 Air Flow Sensor System
13 Inlet temperature Sensor System
14 Throttle Position Sensor System
21 Temperature Sensor System
22 Crank Angle Sensor System
23 TDC sensor <SOHC> or Systematic Camshaft Sensor <DOHC> System Tong
24 Speed Sensor System
25 Atmospheric Pressure Sensor System <T / C>
31 Knock Sensor System
41 Injectors System
44 Ignition Coil, Systematic Power Transistor Unit
-- (No.1 - No.4-cylinder) <DOHC>
52 Ignition Coil, Systematic Power Transistor Unit
-- (No.2 - No.5-cylinder) <DOHC>
53 Ignition Coil, Systematic Power Transistor Unit
-- (No.3 - No.6-cylinder) <DOHC>
61 A / T-ECU And Communication Lines (Torque Reduction Request Signal Line) System
64 FR Alternator System Terminal
71 Vacuum Control Solenoid Valve System <T / C-A / T>
72 Ventilation Control Solenoid Valve System <T / C-A / T>
1A No.1 cylinder accidental fire detection
1B No.2 cylinder accidental fire detection
1C No.3 cylinder accidental fire detection
1D No.4 cylinder accidental fire detection
1E No.5 cylinder accidental fire detection
1F No.6 cylinder accidental fire detection
2C Multicylinder accidental fire detection
Transmission Codes:
11 Non TCL Car – Throttle Position Sensor System - Short circuit
-- TCL Car – Accelerator Pedal Position Sensor System - Short circuit
12 Non TCL Car - Throttle Position Sensor System - Disconnection
-- TCL Car - Accelerator Pedal Position Sensor System - Disconnection
14 Non TCL Car - Throttle Position Sensor System - Sensors misaligned
-- TCL Car - Accelerator Pedal Position Sensor System - Sensors misaligned
15 Oil Temperature Sensor System Disconnection
21 Crank Angle Sensor System Disconnection
22 Input Shaft Speed Sensor System Short-circuit / disconnection
23 The Output Shaft Speed Sensor System Short-circuit / disconnection
26 Stop Lamp Switch system Short-circuit
31 LR Solenoid System Short-circuit / disconnection
32 UD Solenoid System Short-circuit / disconnection
33 2ND Solenoid System Short-circuit / disconnection
34 OD Solenoid System Short-circuit / disconnection
35 RED solenoid system <5 A / T> Short-circuit / disconnection
36 DCC System Solenoid Short-circuit / disconnection
41 Complete Without a fast speed change
42 2-speed variable speed without having completed
43 3 speed complete control of transmission
44 complete 4-speed variable speed
45 complete a 5-speed variable speed <5 A / T>
46 variable speed complete retreat
51 Non TCL Car - Abnormal communication with the engine ECU
-- TCL Car - ASC-ECU abnormal communication
52 DCC solenoid system – Bad System
54 A / T control relay system - Earth short-circuit / disconnection
56 N range lamp system - Earth short-circuit
71 A / T-ECU abnormality
ABS Codes
11 Wheel-Speed Sensor (FR) System (Short or Break)
12 Wheel-Speed Sensor (FL) System (Short or Break)
13 Wheel-Speed Sensor (RR) System (Short or Break)
14 Wheel-Speed Sensor (RL) System (Short or Break)
15 Wheel-Speed Sensor System (Abnormal Signal Output)
16 ABS-ECU Power System (Voltage Abnormal Rise Or Decline)
21 Wheel-Speed Sensor (FR) System
22 Wheel-Speed Sensor (FL) System
23 Wheel-Speed Sensor (RR) System
24 Wheel-Speed Sensor (RL) System
27 2WD/4WD Systematic Detection Switch
33 SUTOP PURANPU SUITCHI system (ON disconnection or failure)
41 Solenoid (FR) System
42 Solenoid (FL) System
43 Solenoid (RR) System
44 solenoid (RL) System
**Note: 41 -42 **
**Each item in the corresponding solenoid DOBARUBU drive signal
**if there is no response or an ABS-ECU power system failure
51 Valve Failure Relay ON
52 OFF relay valve failure or power system failure ABS-ECU
53 OFF Motor ABS - ECU failure or power system failure
54 ON failure MOTARIRE
55 Motor System (Pump Motor Sticking), Or Abs-Ecu Power System Failure
63 ABS-ECU system
ASC codes
11 FR wheel speed sensor (Short or Break)
12 FL wheel speed sensor (Short or Break)
13 RR wheel speed sensor (Short or Break)
14 RL wheel speed sensor (Short or Break)
15 wheel-speed sensor system (abnormal signal output)
16 ECU supply voltage abnormality
17 TCL Group 13 H-switch system troubleshooting
21 FR wheel speed sensor system
22 FL wheel speed sensor system
23 RR wheel speed sensor system
24 RL wheel speed sensor system
25 Rear wheel speed sensor system (Simultaneous left and right rear wheel speed sensor burnout)
26 Rear wheel speed sensor system (Both of the rear wheel speed sensor failure)
27 Around the wheel speed sensor system (Both before and after the wheel speed sensor failure)
31 Ignition Switch (IG2) system
32 G-sensor system around
33 Stop Lamp Switch System (ON disconnection or failure)
35 Steering Sensor (ST-1, 2, N) line
36 Steering Sensor (ST-N)
37 Steering Sensor (ST-1, 2) systematic
41 FR Systematic Solenoid
42 FL solenoid system
43 RR solenoid system
44 RL solenoid system
45 FR diagonal cut valve system
46 FL diagonal cut valve system
47 FR Masu Sumi-to-pressure valve system
48 FL-pressure valve system
49 Accumulator valve diagonal line
51 Valve relay system (ON failure)
52 Valve system relay (OFF failure)
53 Motor system (OFF failure)
54 Motor system (ON failure)
55 Motor system (pump motor sticking)
61 A/T-ECU Group and the communications system
63 ECU fail
65 APS system, or TPS
66 TPS or APS system
67 APS system
71 G-sensor system
72 Yaw Rate Sensor System (Disconnection or short)
73 Master Cylinder Pressure Sensor System
74 Yaw Rate G-sensor system
75 Engine ECU
76 Engines and Communications System
77 TCL vacuum or Ventilation Solenoid Valve system
78 Pressure Accumulator Sensor System
81 brake fluid low
AYC Codes
12 voltage power supply (supply valve) system (short or break)
21 FR wheel speed sensor system (short or break)
22 FL wheel speed sensor system (short or break)
23 RR wheel speed sensor system (short or break)
24 RL wheel speed sensor system (short or break)
25 Different Diameter Tires
26 wheel-speed sensor trouble
31 Steer Sensor (ST-1, ST-2, ST-N) System (break)
32 Steer Sensor (ST-N) system (short)
33 Steer Sensor (ST-N) system
34 Steer Sensor (ST-1, ST-2) system (short)
41 TPS system (short or break)
51 before and after the G-sensor system (short or break)
52 G Sensors Around
56 Next G-sensor System (short or break)
61 Stop Position Switch System (break)
65 ABS monitor system (ABS malfunction or break)
71 Proportional Valve System (short or break)
72 Direction Valve (right) System (short or break)
73 Direction Valve (left) System (short or break)
81 Electric Pump Relay System (short or break)
82 Electric Pump Failure
83 Electric Pump Failure
TCL Codes
11 FR wheel speed sensors (or a short break)
12 FL wheel speed sensors (or a short break)
13 RR wheel speed sensors (or a short break)
14 RL wheel speed sensors (or a short break)
15 Wheel speed sensor system (output signal abnormalities
16 Power supply voltage abnormality of the ECU
17 TCL switch circuit system
21 FR wheel speed sensor system
22 FL wheel speed sensor system
23 RR wheel-speed sensor system
24 RL wheel speed sensor system
25 Rear wheel speed sensor system (left and right rear wheel speed sensors simultaneous disconnection)
26 Rear wheel speed sensor systems (both of the rear wheel speed sensor failure)
27 Around the wheel speed sensor systems (both before and after the wheel speed sensor failure)
31 Ignition Switch (IG2) strains
32 Circuits around the G sensor system
33 Stop lamp switch strains (ON injury or burnout)
35 Steering sensor (ST-1, 2, N) system
36 Steering sensor (ST-N) strains
37 Steering sensor (ST-1, 2) system
41 FR solenoid valve system
42 FL solenoid valve system
43 RR solenoid valve system
44 RL solenoid valve system
45 FR Cut valve diagonal strains
46 FL Cut valve diagonal strains
47 FR Masu Sumi-pressure valve system
48 FL Masu Sumi-pressure valve system
49 Pressure valve (FL-FR) system
51-Valve relay system (ON failure)
52-Valve relay system (OFF order)
53 Motor relay strains (OFF order)
54 Motor Relay system (ON failure)
55 Motor system (pumps, motors sticking)
61 A / T-ECU and the communication system
63 ECU fail
65 APS system, or TPS
66 APS or TPS system
67 APS system
71 system next sensor circuit G
72 Yaw late sensor circuit system (or a short break)
73 circuit master cylinder pressure sensor system
74 Yaw late sensor or G sensor system
75 Engine ECU strains
76 Systematic communication with the engine ECU
77 TCL vacuum system or ventilation solenoid
78 Accumulator pressure sensor circuit system
81 Shortage of brake fluid
- on Thu Nov 12, 2009 5:37 pm
- Search in: Vr4 knowledge
- Topic: Diagnostic Codes - The Full List
- Replies: 1
- Views: 752
Where is engine number located
OK all you need to remove is the front air duct going to the airbox, and a can of WD40 is a must. You really do need to spray lots of WD40, it just seems to bring the number out.You need a good strong torch, the smaller the better.
The first row of the engine number is the same as on the plate. "6A13" then there is another line under that. Mine had 2 letters then 4 numbers.
If you have your cheak resting on the radiator pipe, that is a good view.
- on Thu Nov 12, 2009 5:33 pm
- Search in: Vr4 knowledge
- Topic: Where is engine number located
- Replies: 0
- Views: 606
Car production numbers
Car production numbers:2560 Galant Prefacelift VR-4's were made
1284 Galant Facelift VR-4's were made
23022 Legnum Prefacelift VR-4's and ST-R's were made
3140 Legnum Facelift VR-4's were made
http://recall.mitsubishi-motors.co.jp/Recall/displayselect.do?orderno=11402
- on Thu Nov 12, 2009 5:29 pm
- Search in: Vr4 knowledge
- Topic: Car production numbers
- Replies: 0
- Views: 453
Some useful acronyms
4WD - Four Wheel DriveABS - Anti-lock Braking System
AFC - Active Fuel Controller, see 'S-AFC' below
AFR - Air to Fuel Ratio
ASC - Active Stability Control
ATF - Automatic Transmission Fluid
AVC-R - model of boost controller
AWD - All Wheel Drive
AYC - Active Yaw Control
BOV - Blow Off Valve
CAI - Cold Air Intake
CAPS - Computerized Automatic Parts Search. Mitsubishi Japan's parts search database software. See here
CVR4 - Club VR4
DOHC - Double Overhead Cam
EBC - Electronic Boost Controller
ECU - Electronic Control Unit (sometimes incorrectly referred to as Engine Control Unit, but you can have ECU's for other components such as the automatic transmission)
EFI - Electronic Fuel Injection
EGT - Exhaust Gas Temperature
EIDS - (Electronic Idle Stabilizer) by HKS. This will correct stalling issues connected to VTA blow off valves
E-Manage - Piggyback engine ECU
EMU - E-Manage Ultimate
FMIC - Front Mounted InterCooler
FPR - Fuel Pressure Regulator
FWD - Front Wheel Drive
G TECH - Little in-car black box to measure 0-60 times
IAT - Internal Air Temperature
INVECS (II) - Intelligent and Innovative Vehicle Electronic Control System. See here.
LC-1 - Wideband Controller Standalone Unit
LM-1 - Wideband O2 Digital Air/fuel Ratio Meter
LSD - Limited Slip Differential
MAF - Mass Air Flow
MAP - Manifold Absolute Pressure
MAS - Mass Airflow Sensor (usually MAF Sensor)
MBC - Manual Boost Controller
MMCS - Mitsubishi Multi Communication System - see here.
MUT-II - Mitsubishi Universal Tester 2 (second generation) fault code analysis tool
NOS - Holley branded Nitrous Oxide (N2O) system
RSM - Rev/Speed Meter - It's like the GTECH, but much better. Made by Apex'i
S-AFC - Super Active Fuel Controller. Made by Apex'i, this device allows the user to tweak the car's fueling. AFC-Neo is the latest version.
SOHC - Single Overhead Cam
TCL - Traction Control Limiter
TT - Twin Turbo or Turbo Timer
TPS - Throttle Position Sensor (or Signal)
VR4 - Victory Road AWD (4WD, but it's not an off-road 4WD, so AWD is more applicable) ... No, you really didn't want to know this.
VTA - Vent To Atmosphere (type of Blow-off Valve, as opposed to recirculating)
WOT - Wide Open Throttle
- on Thu Nov 12, 2009 5:27 pm
- Search in: Vr4 knowledge
- Topic: Some useful acronyms
- Replies: 0
- Views: 484
What the different spec models have as features
Series 1 Galant/LegnumVR-4 Auto
Standard: AYC, ASC, TCL, ABS
VR-4 Manual
Standard: AYC, ABS
Super VR-4
Standard: AYC, TCL, ASC, ABS, Recaro Seats, Momo steering wheel
Car of the Year Edition (COTY) (auto only)
Standard: White only, Black leather seats, wood-grain interior trim
FL Galant/Legnum
VR-4 Type V (Manual & Auto)
Standard: ABS
VR-4 Type S (Auto)
Standard: AYC, ABS
Option: ASC, TCL
[according to BradC ASC & TCL are non-existent]
VR-4 Type S (Manual)
Standard: ABS, AYC
Option: Recaro Seats, Momo steering wheel, Carbonfibre dash
There were a few 1996 spec cars that had the silver and grey carbon dash, but all of the supers and facelifts that had carbon were yellow and grey. The later facelifts, from middle of 2000 moved to a solid silver dash at the same time they changed from red and black recaro
- on Thu Nov 12, 2009 5:22 pm
- Search in: Vr4 knowledge
- Topic: What the different spec models have as features
- Replies: 0
- Views: 484
Power differences between Series 1 and 2 VR4s
I've been hunting around on the net looking for info on the differences power wise between the Pre face-lift and face-lift models, no where i have found say's there is major differences in the motors but i came accross these two sites tho, they have information on all the models by production month/year. It seems to me that the 96 models with an auto were 260hp but the manuals were 280hp and after that both the manuals and autos are 280hp???Have a look i'm intrested in know what other people get out of this info i would of thought the autos would produce less power because the motor has to run the auto box tourque convertor etc but i'm no mechanic
http://english.auto.vl.ru/catalog/mitsubishi/legnum/
http://www.cars-directory.net/specs/mitsubishi/legnum/
Prefacelift Auto = 260hp (incl Super VR-4)
Prefacelift Manual = 280hp
Facelift Auto = 280hp
Facelift Manual = 280hp
- on Thu Nov 12, 2009 5:20 pm
- Search in: Vr4 knowledge
- Topic: Power differences between Series 1 and 2 VR4s
- Replies: 0
- Views: 578
Chassis codes for VR-4s
LegnumSeries 1
VR-4 manual - E-EC5W-LNGF (there's no mention of it but I suspect that if there's an auto base model it would be E-EC5W-LRGF)
VR-4 Type S Auto - E-EC5W-LYGF
Series 2 1998-2000
VR-4 Type V Auto - GF-EC5W-LYGF3 (no mention of manual, but I'm suspecting it would be GF-EC5W-LNGF3)
VR-4 Type S Auto - GF-EC5W-LYGF
2000-on
VR-4 Type S manual - GF-EC5W-LNGF
Galant
Series 1
VR-4 manual - E-EC5A-SNGF (E-EC5A-SRGF if there's an auto base model??)
VR-4 Type S Auto - E-EC5A-SYGF
Series 2
VR-4 Type V manual - GF-EC5A-SNGF3
VR-4 Type V auto - GF-EC5A-SYGF3
VR-4 Type S auto - GF-EC5A-SYGF
- on Thu Nov 12, 2009 5:17 pm
- Search in: Vr4 knowledge
- Topic: Chassis codes for VR-4s
- Replies: 0
- Views: 1312
Various information on the VR-4
Fuel consumption - very good for what it is. I used to regularly get 10l/100km and less on country trips, depending on what cruising speed I chose lol. Like all turbos, can go up rapidly when you drive hard, and the tank isn't overly large on them. They are AWESOME open road cars - passing road trains was a hoot! Could easily be done in 5th just letting the torque do the work, but 3rd was much more fun. SmileHandling - firmer than a normal Commo, but certainly not Evo hard. I would've preferred it a little harder but then you compromise comfort for everyday use. Perfect for what it is - an executive express.
Seats - pretty average for a sports car as far as holding you in, but easy to get comfortable in. The Recaro factory option on the series 2s (and the Super VR-4s series 1) is a much better deal. Velour trim is very hard wearing and leather the same, although you tend to slide a bit when pushing hard. If you plan to upgrade your performance, factor in seats too.
Trans - I bought a manual, but having driven the auto, I think the nature of the motor is much better suited to the auto. Turbos are quite small, giving it an excellent midrange but leaving it breathless higher up (although the motor itself revs really freely). The series 1 autos only had 260ps, then went to 280ps in the series 2s. Not as quick as a manual off the line, but still move pretty quick.
Maintenance - I used Ultratune, beleive it or not. Mitsu Oz were a waste of time and money. Didn't want to know it. I made good friends with the service dept at Auckland Motors Mitsubishi (absolute legends), and they faxed the Ultratune blokes all the parts needed for various services and the cost, then we just ordered them in advance and serviced it when they arrived. The only big job I did was the clutch, and even though the plate is exactly the same as a manual Magna, it was cheaper for me to import one from NZ than buy locally - go figure...
- on Thu Nov 12, 2009 5:15 pm
- Search in: Vr4 knowledge
- Topic: Various information on the VR-4
- Replies: 0
- Views: 506
8Th gen VR-4 specs
http://specs.amayama.com/search/ type in galant 1996>2000http://specs.amayama.com/mitsubishi/legnum/
8th generation (EC5A/EC5W)
8th generation
Production1996–2002AssemblyNagoya plant, Okazaki, AichiClassMid-size carBody style(s)4-door sedan, wagonLayoutFront engine, 4WDEngine(s)2498 cc DOHC 24v V6, twin-turboTransmission(s)Four-wheel drive, 5-speed semi-auto - 5-speed manual
The final VR-4 was introduced in 1996. The engine capacity was enlarged substantially to 2.5 L, which pushed the power up by 15 percent to the Japanese voluntary limit of 280 PS. The car was now capable of over 150 mph when derestricted, and could accelerate from 0-60 in about six seconds.
The Type-V model could be specified with either the existing 5-speed manual or the optional INVECS-II, which was now an advanced self-learning 5-speed semi-auto based on Porsche's Tiptronic transmission, while the Type-S model offered the optional Active Yaw Control (AYC). This complex rear diff was first seen on the Lancer Evo IV, and used an array of sensors to detect and quell oversteer, giving the ultimate VR-4 great agility for a vehicle of its size and weight.
With the 8th generation of the Galant, Mitsubishi introduced a station wagon Legnum) to replace the old 5-door hatchback, and the VR-4 was now available in both body styles.
North America and Europe were again denied this model, but the burgeoning grey import trade meant that it developed a cult following in several overseas territories, especially the United Kingdom and New Zealand. In 2000 MMC's motorsport partner Ralliart was contracted to type-approve
Technical specifications
Engine Configuration — DOHC 24v V type 6 cylinder
Code — 6A13TT
Bore/stroke, capacity — 81.0 × 80.8 mm, 2498 cc
Compression ratio — 8.5:1
Fuelling — ECI-MULTI, premium unleaded fuel
Peak power — 206 kW (280 PS) @ 5500 rpm
Peak torque — 367 N·m (271 ft·lbf) @ 4000 rpm
Transmission — 5 speed semi-auto / 5 speed manual
Suspension — Multi-link (front & rear)
Dimensions Length — 4680 mm Width — 1760 mm Height — 1420 mm Wheelbase — 2635 mm Curb weight — 1520 kg Fuel tank — 60 L Wheels/tyres (known in many markets as the Galants and Lancers for UK sales, and 200 VR-4s were officially imported before production finally ceased two years later. — 225/50 R16 91V
Future
Production of the VR-4 was halted in 2002 along with the rest of the Japanese-produced eighth generation, and there has been no indication of a direct replacement.
- on Thu Nov 12, 2009 5:10 pm
- Search in: Vr4 knowledge
- Topic: 8Th gen VR-4 specs
- Replies: 0
- Views: 565
Mitsubishi Vr4 FAQ
Caps - Mitsubishi Parts DatabaseWhen Mitsubishi look up parts for your car this is the parts system they use to look up part numbers for you. Useful for looking up your own part numbers. Also helps compare/cross refrance parts with other mitsubishi models.
Facelift & Pre-facelift - Series 2 and Series 1 Legnum, respectively
The Series 2 Legnum VR4 was produced from 1998 to 2002. It's called the 'facelift' because while most of the car is identical to the Series 1 (which ran from 1996 to 1997), there are slight external differences which are the most obvious changes. These included a redesigned front bumper, including a pair of twin fog lights instead of the single light pair on the Series 1, and a redesigned tail lamp assembly and plastic tailgate finishing running between the lights on the Series 2.
Non-cosmetic changes include two slightly different models in the Series 2, the Type V and the Type S. The type S includes AYC just like the Series 1, while the type V does not.
Other differences include... (feel free to add more differences here)
MMCS - Mitsubishi Multi Communications System
The MMCS unit was a factory option in the Galant and Legnum VR4. It includes touch-screen control of a number of functions, including the factory airconditioning system, Japanese television and radio station selection, Japanese GPS and satellite navigation system etc.
AYC - Active Yaw Control...
is an automobile feature designed by Mitsubishi Motors, first introduced in the Mitsubishi Lancer Evolution IV. It has been included in certain models of every subsequent generation, and was also used in the VR-4 variant of the 8th generation Galant and Legnum.
Active Yaw Control is based on a computer-controlled rear differential which can actively split torque based on input from various accelerometers in the vehicle measuring longitudinal and lateral g forces, steering, brakes and throttle position. Where ABS brakes are fitted they too are included in the input parameters. It accomplishes this via two hydraulic clutches which can limit torque on individual axles. AYC is a performance-oriented system which aims to increase cornering speeds.
A much deeper explanation is at http://www.lancerregister.com/faq/G04/g04.html
INVECS & INVECS-II (Intelligent and Innovative Vehicle Electronic Control System)
The first generation of INVECS debuted in the 7th generation of the Mitsubishi Galant which was introduced in 1992. An array of sensors continuously monitored six parameters and, using "fuzzy logic", adapted the shift patterns in the automatic gearbox "on the fly" according to the driver's style. Despite sharing its name with the previous system, INVECS-II was a radical development, based on Porsche's Tiptronic semi-automatic transmission technology. As with Porsche's version it allowed for either a fully automatic mode, or a clutchless semi-automatic mode if the driver wished to control the up- and down-shift points. It also offered the same Adaptive Shift Control software which monitored and "learned" the driver's habits over time and adjusted the smoothness or aggression of the gearshifts to suit his style. INVECS-II can be reset by disconnecting the battery for approx 30 seconds.
- on Thu Nov 12, 2009 5:06 pm
- Search in: Vr4 knowledge
- Topic: Mitsubishi Vr4 FAQ
- Replies: 0
- Views: 1193
kaikenlaista dataa
ok, what you've been waiting for!Just in case it isn't 100% clear in the pics:
From the floor to the boot opening is 770mm
From the base of the high point on the back seats to the piece of plastic at the end of the boot is 1710mm
From the back of the front seats in a normal seating position to the piece of plastic at the end of the boot is 1780mm. If you slide the seat all the way forward it goes up to about 1900mm
If the back seats are upright you have 870mm at the top of the seats and about 1000mm at the bottom of the seats
The full width right at the back is 1350mm
The width between the wheel arches is 890mm
The width between the elbow rests on the back seat is 1280mm
- on Wed Nov 11, 2009 10:00 pm
- Search in: Legnum VR-4
- Topic: kaikenlaista dataa
- Replies: 0
- Views: 9062
Stage I - White/Blue
Suunnilleen tältä auto näytti ulkoisesti tässä vaiheessa. Sillä sitten reissattiin ympäri suomea ja käytiin jokapäivä töissä ja kaupassa sun muissa paikoissa. Hieman jotkut ihmetteli välillä noita etuvaloja, keula muutenkin oli paljon mielenkiinnon kohteena. Leijonalla käytiin myös eurocruisingeissa muutaman kerran ja tuurissakin tehtiin visiitti. Tähän aikaan tein ankarasti töitä ja muutenkin auto oli enemmän jokapäiväinen käyttörassi, niinkuin se tulee aina olemaan. Mitään näyttely autoa sun muuta tästä ei kyllä ikinä tule. Tässä vaiheessa auto sai vielä alustamassauksen ja ruostesuojakäsittelyn, myös on mukavaa että leijonassa on täyssinkitty kori. Vähentää ehkä ruostetta tai sitten ei, se on sitten sen ajan murhe. Leijona kulkee myös talvisin, talvella alla oli 16" alession turbo vanteet ja nokian hakkapeliitat. Kivana yllärinä kun ensimmäistä kertaa tutkin autoa niin löysin auton vakiovarusteena saatavat lumiketjut alkuperäisestä paketista ja sissilapion peugeot logolla
Jossain vaiheessa kyllästyin auton äänimaailmaan ja heitin sen hetkisen 2tie setin taakse ja hommasin saman valmistajan paremman 3 tie setin eteen, hommasin myös toisen caliberin vahvarin ja muutaman näytöllisen jakoblokin - just for show. Sitten jossain mielenhäiriössä asensin myös lisää uv valoja autoon, mm takapenkkiläisten kattovalot muuttuivat uv valoksi. JBL:n subi vei ihan liikaa tilaa tässä vaiheessa kun piti työkamoja ja muuta roinaa kuljetella joten laitoin sen kiertoon ja hankin tilalle caliberin 12" kromatulla rungolla ja LE nauhalla toteutetun kartio logollisen subin, pointtina oli kotelon viemän tilan pienentäminen. Tällä setupilla sitten rundattiin siihen asti että päästiin jo Stage 2 puolelle suht pitkällekin.
- on Tue Nov 10, 2009 6:41 pm
- Search in: P406
- Topic: Stage I - White/Blue
- Replies: 3
- Views: 563
Stage I - White/Blue
Sitten aloinkin hommaamaan kaikenlaisia kivoja osia tarkoituksena asentaa ne heti, toisin kuitenkin kävi ja osa osista tuli kiinni vasta paljon myöhemmin. Ensimmäiseksi bongasin sportpug foorumilta hemmon joka värkkää alcantrasta vaihdekepin pusseja edullisesti. Oma pussi postiin malliksi ja kohta jo saapuikin kuvassa näkyvä pussi. Sitten vaan matka herttonääs teollisuus alueelle ja mukaan tarttui pari kappaletta kuvassa näkyvää riittävän kokoista hiilikuituvaimenninta. Hetken päästä posti toikin sitten SLR tyyliset vilkkupeilit ja muka sopivat adapterit. Adaptereita joutui aika paljon muokkailemaan että sopivat paikoilleen. Ja näistähän asennettiin vain tuo pussi


Sitten kun olin jo perseelläni päättänyt että leijonan vakiosohvat ovat ikävät istua ja satuin huuto.nettiä selatessani bongaamaan halvat ja käyttämättömät FK Racer penkit, tosin väri oli mitä oli mutta se ei menoa haitannut. Huutamaan vaan ja kappas olin ainoa huutaja ja jopa satuin voittamaan kyseiset penkit. Penkit jopa sopivat leijonan vakiokiskoihin melkein, ne vaativat vain hieman poraamista ja hitsaamista. Kaikki turvavyö ratkaisut yms ovat siis vieläkin vakioita


Penkit mahtuivat juuri ja juuri niinkuin kuvista voi päätellä. Kaikki toimii niinkuin pitääkin mutta yhtään isompia sinne ei olisi mahtunut. Semi riskillä mentiin kun en tiennyt penkkien mittoja vaan arvioin käyttäen toisesta escortista ylijäänyttä Fk: kuppipenkkiä mallina. Onneksi mahtuivat


Pitihän niitä kokeilla takapenkillekin siinä asentaessa, sopivat muuten erittäin hyvin kuin paremmin. Varmaan tästä jäi alitajuntaan joku idea että jossain vaiheessa nuo penkit vielä tulisivat korvaamaan vakio takapenkin, varsinkin kun taas jälleen kerran kiinnikkeet olivat melkein valmiina ja kaikki turvalaitteet olisivat jääneet vakioiksi - jälleen kerran. Tässä vaiheessa asenneltiin myös Xenonit nokalle ja vaihdettiin hieman pienemmät ja virtaviivaisemmat sivuvilkut.


Muistaakseni tällä kokoonpanolla huristeltiin sitten melkein vuosi iloisesti, kunnes taas alkoi alitajunnassa kummittelemaan se korisarja ja takapenkit ja parempi hifi laitteisto. Ensiavuksi asensin läppärin hansikaslokeroon pyörittämään musiikkia ja videoita. 1 scriini oli takapenkkiläisille kiinnitettynä takatuhkakupin tilalle, ja kokohan oli huima 7" widescreen. Jossain vaiheessa myös leijona sai uudet mittarinpohjat ja oikeat tummennus kalvot takaikkunoihin. Ja heivattiin pois paikoilleen ruostunut irroitettava vetokoukku jonka joutui siis irroittamaan rälläkällä ja lekalla.
- on Tue Nov 10, 2009 6:40 pm
- Search in: P406
- Topic: Stage I - White/Blue
- Replies: 3
- Views: 563
Stage I - White/Blue
Ulkopuolen lievän muutoksen takia sisusta vaikutti sitten erittäin tylsältä, joten sille piti tietenkin tehdä jotain. Homma aloitettiiin sillä että revittiin kaikki hieno jalopuutarra pois sieltä ja vanhat puhelin telineet saivat kyytiä. Sitten listat ja ritilät maalattiin hopeisiksi. Osaan asennettiin hetkeksi siniset ledit. Samalla muutettiin keskikonsolia aika radikaalisti. Tässä vaiheessa asennettiin myös uudet poljin pinnat ja heivattiin kumimatot mäkeen ja korvattiin ne peugeotin omilla kangasmatoilla.


Hetken taas tyydytti mutta sitten päätin purkaa vähän lisää ja alkaa asentamaan hieman äänieristystä. Kaikki ovet sisä ja ulkopelti, tulipelti, katto, B ja C pilarit, hattuhylly ja osa takapenkin alapuolta on nyt täynnä äänieristyslevyä. Samalla vedettiin RCA kaapelit ja virtakaapelit tulevaa Hifi järjestelmää varten. Samalla siinä purkaessa paljastui miksi auto kuulostaa niin kaamealta, autoon oli tehtaalta jo asennuttu joku upea ja hieno äänentoisto järjestelmä johon kuului pahviset ovikaiuttimet, monotoninen subbari, vinkuvat piipperit ja joku hämärä vahvistin, mutta mutta - asentaa frank oli unohtanut kytkeä piippereiden johdot vahvariin, olihan ne siihen viereen asti tuotu ja hienosti vielä muovit päällä. Samaten se upea subi oli yhtä hyvä siinä hommassa kuin escortin vakiokaiuttimet omissaan - eli täys paska. Kaiuttimet sentään olivat kiinni ja niistä jotain piipitystä välillä kuuluikin. No kaikki heivattiin helvettiin tässä vaiheessa häiritsemästä asennusta. Olihan se varmaan hyvä yritys ja silleen.


Samalla piti tietenkin laittaa vähän järeämpää eristystä konttiin, kontin lattia ja osa seinistä sai vähän järeämpää mattoa sisuksiinsa. Samalla laiteltiiin turhia aukkoja umpeen ja poistettiin keskimatkustajan turvavyöt ja keskikäsinoja muutettiin kiinteäksi. Samalla laiteltiin piuhat konttiin valmiiksi, Rca, virta, maadoitus yms. Myös antenni heivattiin katolta pois ja sekin reikä tinattiin umpeen ja maalattiin auton väreihin.


Sitten olikin jo aika saada vähän ääntä kabiiniin. sonyn mp3 pyöritin löysi tiensä keskikonsoliin ja oviin ilmestyi alpinen 2tie setti. Hattuhyllylle päätyi caliberin vahvistin ja kondensaattori. Jbl hoiti sitten jytäpuolen kontissa. Samaan settiin iskettiin uusi exiden akku keulalle ja haettiin penkinpäälliset ja vähän sisustamaalia sinne tänne. Ovet saivat kaiuttimien asennuksen aikaan vähän uutta kangasta ja väriä päällensä. Ja tietenkin kaikki piuhat olivat asianmukaisia eivätkä mitään paukkulankaa. Myös kartturin jalkatuki tuli hankittua tässä vaiheessa jos nyt en ihan väärin muista, ihan vaan sen takia että ajattelin myöhemmin asentaa sen taakse jotain mielenkiintoista, eli olisi toiminut samalla suojana. Tosin sinne ei sitten koskaan asennettu mitään kun tavarat löysivät paikkansa jostain ihan muualta.


Jossain vaiheessa asensin myös uuden vaihdekepin nupin, alumiinia gripillä ja ohjelmoitavilla ledeillä. Samalla muistaakseni myös osa sisävaloista vaihtui siniseksi ja konttiin asennettiin muutama uv putki. Tuhkakupin tilalle rakennettiin sen muotoa hyväksi käyttäen vahvarin kaukosäätimen paikka. tuhkiksen kantta kun painoi niin se avautuu ja koko hässäkkä nousi esille. Tämäkin valaistiin sinisillä ledeillä. Kuin myös hanskis sai osakseen hieman uv valoa.
- on Tue Nov 10, 2009 6:40 pm
- Search in: P406
- Topic: Stage I - White/Blue
- Replies: 3
- Views: 563
Stage I - White/Blue
Muistaakseni ajatus uudesta autosta heräsi siinä vaiheessa kun huomasin että entisessä autossani ( ford escort cabriolat mk4 ) ei ollut enään tilaa, takakontti oli jo aikaa sitten antautunut hifille ja takapenkki oli lähinnä repunkuljetusteline. Päällimmäisinä kriteeteinä oli tässä vaiheessa 4 ovea, suht mukava kulutus ja silmää miellyttävä vakio ulkonäkö. Myös kaikennäköinen vakioluxus kiinnosti escortin jälkeen, siinähän ei oikeastaan ollut yhtään mitään vakiona. Ja yksi oleellinen asia oli kanssa takakontin koko, joka onkin leijonassa aika iso, 3 aikuista miestä menee heittämällä konttiin sen ollessa tyhjänä - on kokeiltu
Hetken aikaa mietittyäni päädyin suht edulliseen peugeot 406 ST 2.0 malliin lähinnä sen vakio ulkonäön ja suht harvinaisen modauskohteen takia. Edellinen omistaja oli tehtaalta auton tilanneena ruksinut myös mukaan kaikenlaisia kivoja lisävarusteita, mm cruiserin. Autossa oli valmiina jotkut tummennuskalvot jotka tosin poistettiin suht nopeaan. Alla oli myös jonkinnäköinen rosterivaimennin. Mankkana oli huima clarionin vakio kasetti dekki! Hyvänä puolena oli että autolla oli ajettu vain noin 70000 ja se oli yhdeltä omistajalta ja autossa oli täydellinen huoltokirja. Ensimmäinen homma olikin pestä koko auto niin sisältä kuin ulkoolta, kaikenlaista mielenkiintoista löytyi auton penkkien alta, mm erimaalaisia eurooppalaisia rahoja, avaimet ym ym. Kyllä se näytti mukavalta pestynä ja vahattuna kun käytiin retkellä tuolla luonnon helmassa ja samalla kuvailtiin hieman. Nämä kuvat on jossain ihan normi kuvia, tässä vaiheessa en vielä omistanut digi kameraa, pitääkin koittaa kaivaa niitä ja scannata niitä tänne teidän ihmeteltäväksi.


Melkein heti auton hankinnan jälkeen hankin käytettynä ainoat tällä jaolla ja koolla olevat Masitaly phb 18"x8" vanteet jotka olivat maalatut vielä uniikeiksi. Kumeina oli muistaakseni Pirellin huippu kumit. Ainakin on huulta ja kokoa ja näköä


Suht nopeasti kyllästyin auton keulaan ja päätin sahata ritilät irti ja poistaa myös toimimattomat sumuvalot ja verkottaa koko keulan. Samaan syssyyn napattiin leijona merkki keulalta pois ja jatkettiin tota ripaa myös keskelle ja yhdistettiin se yhdeksi isoksi, maskin alue alkaa näyttää aika kivalta. Samalla poistettiin lampunpesurit, niillä ei oikeastaan tee mitään kun toinen niistä oli rikki jo valmiiksi ja toinen ei toiminut oikein kunnolla. Muistaakseni tässä vaiheessa hävisivät myös kaikki ylimääräiset tarrat autosta. Mahtavat abs ja peugeot tarrat oli helppo ottaa pois mutta Satumaa auto mainos tarranen olikin jo sitten haastavampi. Tässä vaiheessa oli toisenkin puolen kylki jo sheivattu tasaiseksi ja maalattu valmiiksi.


Sitten päätettiin piristää keulaa vähän lisää ja hommattiin 306 tarkoitetut mustat angel eyes valot, niiden sovittamisessa olikin sitten tekemistä. Ne kun eivät sopineet oikeasti siihen mitenkään päin. Konepeltiä piti jatkaa ja etulokasuojia muotoilla uudestaan. Maskille ei tehty tässä vaiheessa mitään koska jossain takaraivon alitajunnassa piili jo stage 2 mielessä. Ja kun kerta oltiin muokkaamassa niin autosta revittiin pois kromi-muovi logot, niistä jääneet pienet reiät tinattiin umpeen ja maalattiin auton väreihin.


Jossain vaiheessa myös uudet päivitetyt jarrupalat ja levyt tulivat ajankohtaisiksi, samalla raaputeltiin paska pois satuloista ja maalattiin ne mustiksi. Jossakin vaiheessa myös iskarit vaihtuivat Spaxin sport malliin. Tässä vaiheessa oli ulkonäkö ihan kiva omasta mielestäni ja olikin pikkuhiljaa mietittävä jatkosuunnitelmia. Ja kun musiikki on suht tärkeää ja vakio grammari oli yhdeksännestä helvetistä niin...
- on Tue Nov 10, 2009 6:39 pm
- Search in: P406
- Topic: Stage I - White/Blue
- Replies: 3
- Views: 563
List of possible mods for the VR4
Details for Black Diamond Brakes are:Postal Address:
Black Diamond Performance
Unit 4
Telletholme Industrial Estate
Tollgate Road
Burscough
Lancashire
L40 8RT
Telephone:
01704 893939
Fax:
01704 893899
Email:
sales@blackdiamondperformance.com
Not sure about direct buying but www.europerformance.co.uk stock them.
Going off the fitment guide it looks like they are facelift only:
Galant (97->) VR-4 2.5 V6 Twin Turbo 24v (EC5A) 10/99-01 F-V KBD 978 294 24 22.4 -
Galant (97->) VR-4 2.5 V6 Twin Turbo 24v (EC5A) Rear Disc 10/99-01 R-V KBD 1045 284 20 18.4 -
- on Sun Nov 08, 2009 10:05 pm
- Search in: Legnum VR-4
- Topic: List of possible mods for the VR4
- Replies: 4
- Views: 2150
List of possible mods for the VR4
I find myself not beeing able to edit my first post..Would like to change the Bilstein info since this came up:
http://www.clubvr4.com/forum/showthread.php?t=18305
And I am sure you guys could fill in more info on retailers, prices etc..
A little bit more to the suspension area:
Cusco Rear Anti-Roll Bar - 535311B24
Item number 444002867 | Price: £ 165.00 (inc VAT)
Funkystyling
Cusco Front Anti-Roll Bar - 535311A22
Item number 444002866 | Price: £ 165.00 (inc VAT)
Funkystyling
Tein EDFC
Item number 3827 | Price: £ 245.50 (inc VAT)
Funkystyling
Tein S tech lowering springs for the Legnum
Retailer: Camskill
Price: £168
- on Sun Nov 08, 2009 10:04 pm
- Search in: Legnum VR-4
- Topic: List of possible mods for the VR4
- Replies: 4
- Views: 2150
List of possible mods for the VR4
ExhaustCustom made preferred!
Originally Posted by
stainless system with lifetime guarantee::
2.5 inch cat back - £449.00 inc fitting
2.5 Turbo's to cat - £399.00
HKS Super Drager
Ralliart Exhaust
Fujitsubo
Blitz Exhaust
http://www.grahamgoode.com/
Induction
Blitz induction
HKS Super Power Flow Induction
SS Induction Heat Shield
BMC Carbon Air filter
Simota cone air filter
HKS Direct Drive Induction
PIPERCROSS Air Feed
K&N filter
Apexi Induction Kit
- on Sun Nov 08, 2009 10:03 pm
- Search in: Legnum VR-4
- Topic: List of possible mods for the VR4
- Replies: 4
- Views: 2150
- on Sun Nov 08, 2009 10:01 pm
- Search in: Legnum VR-4
- Topic: List of possible mods for the VR4
- Replies: 4
- Views: 2150
List of possible mods for the VR4
I thought it could be interesting to have a list of possible mods/aftermarket parts for the VR4 so I started one..But since I don't own one myself I'm hoping to get plenty of help of you guys!
My intentions with the list was to be a help for new owners at this forum. Smaller mods like changing the gearknob is of course not included since the list would be a little too big..
Missing retailer info and prices for lots..
Suspension
D2 - D2-M12 (Galant), D2-M126 (Legnum)
http://www.d2racingsport.com/
Retailers:
http://www.d2racingsport.co.uk/
http://www.nzperformance.co.nz/
Prices:
£643 inc vat and delivery (Impulse performance)
$1349.00 (nzperformance)
Bilstein
BTS B12 (SE5-8841), lowers: 30mm
Retailers:
www.forza.se
Prices:
£525 on the bilstein kit retail is £608.65
Tein
WAGON DAMPER (HEIGHT ADJUSTABLE ONLY )
Retailers:
?
Prices:
£490 + VAT
SUPER WAGON DAMPER ( AS ABOVE + REBOUND AND EDFC COMPATIBLE )
Retailers:
?
Prices:
£650 + VAT
GT WAGON ( AS ABOVE BUT WITH ADJUSTABLE PILLOW BALL UPPER MOUNTS )
Retailers:
?
Prices:
£895 + VAT
Ralliart
RALLI///ART Suspension Package -40mm (-2") with Adjustable Shocks
Retailers:
?
Prices:
?
HKS
HKS Adjustable Suspension
Retailers:
?
Prices:
?
Sustec Pro height adjustable suspension
Retailers:
?
Prices:
?
Braided Stainless Brake lines
Goodridge
SMT0200-8
Retailers:
www.gpartners.se
www.asperformance.com
Prices:
?
Originally Posted by
Speak to Alyn at AS Performance - He does a Goodridge kit for £55
Brakes
FRONT
Discs
National Racing 8 Groove Front Discs PBD 978 (front, performance), PBD 1045 (Rear, performance)
Retailers:
?
Prices:
?
Originally Posted by
From the standard part number reference, eg NBD 001, dropping the N and replacing with a “P” denotes a performance disc and by adding a further code letter after the number denotes the style or type (Refer Below)
PBD 001 B = Cross or X Grooved type.
PBD 001 D = Drilled & Drilled type, also known as the Combi or Combination type.
PBD 001 F = Drilled Type, also known as the cross drilled type.
PDB 001 G = 8 Grooved type.
PBD 001 M = 12 Grooved type.
PBD 001 X = 16 Grooved type.
Black Diamond Front Brakes Disks
Retailers:
?
Prices:
?
EBC drilled and grooved discs
Retailers:
?
Prices:
?
EBC Turbo groove Discs Partnr: GD974
Retailers:
?
Prices:
?
Lockheed SL Brake Disks
Retailers:
?
Prices:
?
Pads (for standard calipers)
EBC Red Stuff pads partnr: DP3954C (Rear: DP3738C)
Retailers:
Several retailers, no problem finding them.
Prices:
£50-60
Ferodo DS2500 Racing Front Pads
Retailers:
http://www.camskill.co.uk/
Prices:
£90
Pagid
Retailers:
?
Prices:
?
Big brake kits
AP Racing 330x28mm Radiused Drilled discs
AP Racing 6 Pot front calipers (CP5570) - work with Ferodo DS2500 Racing Pads (AP Racing shape - FRP-216H)
Retailers:
?
Prices:
?
KAD front brakes - 6 pot calipers (powder coated black) with
330mm discs and Ferodo DS2500 Racing Pads (AP Racing shape - FRP-216H)
Retailers:
?
Prices:
approx £1500 ?
Originally Posted by
Front brake upgrade kit is £1,458.00. You get the 6 pot calipers, discs, braided hoses, DS2500 or Pagid alternative pads plus a bottle of Dot 5.1 fluid.
Hi Spec big brake kit - Monster 6 360/32mm for 18 inch wheels or biggerRetailers:
http://www.potn.co.uk/hi-spec-brakes...5_p1127266.htm
Prices:
£1,357.12
EVO 5-7 standard brakes fits the facelift
Need to change to longer brake lines?
Originally Posted by
longer brake flexi pipes ( VR4 ones are a bit tight)
REAR
AP Racing 280x22mm Radiused Drilled discs
AP Racing 4 Pot Calipers (CP5100)
Retailers:
?
Prices:
?
EVO 5-7 standard brakes fits the facelift (295mm?)
When doing a brembo brake upgrade on a pre facelift VR4 you need:
* hub carriers (from a post facelift VR4),
abs sensors, (from a post facelift VR4),
wheels that have enough clearance for the brembo calipers (from an evo)
longer brake flexi pipes ( VR4 ones are a bit tight)
Brake discs from an evo, or for an evo, (You cannot use brembo calipers with standard VR4 front discs),
brake pads for the calipers
Bodykits & Exterior styling
Check these sites first:
http://www.spoilers.com
http://www.j-rally.net/%7Emarjo/comfort/leg1/index.html
http://www.slipstreamperformance.co.nz/legnum.htm
www.speedfactory.co.nz
http://www.topmix.com.hk/
Cyber Front Bumper - Galant 99-03 JDM Spec
Item number 444002417
Retailers:
http://www.funkystyling.co.uk/
also
http://www.racerwheel.com/exterior-b...plete-kit.html
Prices:
£ 265.00 (inc VAT)
Cyber-2 Front Bumper - Galant 99-03
Item number 444002413
Retailers:
http://www.funkystyling.co.uk/
also
http://www.racerwheel.com/exterior-b...plete-kit.html
Prices:
£ 299.00 (inc VAT)
Bodykit for Galant - similar to Erebuni Shogun Style v3.0 #651
Front Bumper £280
Rear Apron £200
Side Skirts £260
Retailers:
http://www.karma-import.com/bodykit.php
Prices:
Whole Set = 630 inc.VAT
VIS Carbon Fibre Bonnet - Evo Style - Galant 99-00 - 99MTGAL4DEV-010C
Item number 445005123
Retailers:
http://www.funkystyling.co.uk/
Prices:
£ 560.00 (plus postage)
Monster Bonnet - Galant 99-03
Item number 444002420
Retailers:
http://www.funkystyling.co.uk/
Prices:
£ 349.00 (plus postage)
Erebuni
http://www.spoilers.com
UK retailer: www.theracersedge.co.uk
MITSUBISHI GALANT Shogun Style v3.0 #651
Prices: US$ 929
MITSUBISHI GALANT Shogun Style v10.0 #113
Prices: US$ 993
MITSUBISHI GALANT Shark Style v1.0 #384
Prices: US$ 929
Z3 Style Fenders, Fiberglass #113ZF
& Carbon Fiber #113ZFCF
Prices:
US$ 190 and 440
OEM Style Hood, Carbon Fiber #384HOODCF
Prices: US$ 540
Racing Style Hood, Fiberglass #651HOOD
Prices: US$ 357
Racing Style Hood, Carbon Fiber #651HOODCF
Prices: US$ 640
Racing Style Hood, Carbon Fiber #113HOODCF
Prices: US$ 640
Racing Style Hood, Fiberglass #113HOOD
Prices: US$ 357
To the Galant there are 5 different wings to choose from ranging in prices from US $156 to 286
Misc mods
Originally Posted by
If you're into changing side indicators/blinkers from orange to clear, purely for aesthetic reasons, standard Mitsubishi clears ones are the same price, or cheaper, than most aftermarket styling outfits. Plus they fit perfectly!
Mitsubishi Pt No. MMR442389 Description N/STK LAMP ASSY £8.73ea+VAT.
Cusco Turbo Pipe Kit - 535030A
Item number 444001329
Retailers:
http://www.funkystyling.co.uk/
Prices:
£ 220.00 (plus postage)
S/S Engine Pipes with SFS Silicon Couplers
Retailers:
?
Prices:
?
Ralliart Front Upper Strut Bar - RAEC5406S1
Item number 2475
Retailers:
http://www.funkystyling.co.uk/
Prices:
£ 290.00 (inc VAT)
Aftermarket transmission cooler
Retailers:
?
Prices:
?
- on Sun Nov 08, 2009 9:53 pm
- Search in: Legnum VR-4
- Topic: List of possible mods for the VR4
- Replies: 4
- Views: 2150

Page 1 of 2 • 1, 2 ![]()
|
|
|